
by Giovanni Carrera, 3/03/2022
ESP32 has two 12-bit SAR (Successive
Approximation Register) ADCs which are able to convert up to 18 analog inputs. The
maximum value to convert is equal to the reference value Vref, for the ESP32 it
is about 1 V, but it can vary between 950 and 1100 mV. It is possible to use
voltages higher than Vref by attenuating the input. The ESP32 has four possible
attenuation options:
|
Attenuation |
input voltage range |
|
ADC_ATTEN_DB_0 |
100 mV ~ 950 mV |
|
ADC_ATTEN_DB_2_5 |
100 mV ~ 1250 mV |
|
ADC_ATTEN_DB_6 |
150 mV ~ 1750 mV |
|
ADC_ATTEN_DB_11 |
150 mV ~ 2450 mV |
In my case, the default attenuation
is 0 dB, with an input range of about 68 to 995 mV. For better accuracy it is
recommended not to use attenuation, ie 0 dB, and to employ the pins of ADC1, I
used GPIO34.
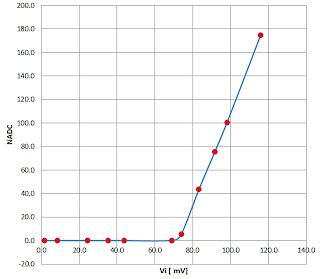
Figure 1 shows a fairly serious
problem on low input levels: below 68 mV the converter output gives zero,
creating a dead zone and strong non-linearity.
 |
| figure 1 |
So I tried to think of a circuit able to accept
an input down to zero volts and to output a signal that can be converted
without the drawbacks described above. If, for example, we want to have the
following conditions:
Vin = 0 mV → Vout = 100 mV
Vin = 3000 mV → Vout = 1000 mV
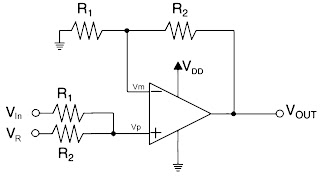
The summer circuit, shown in figure 2, realizes
these conditions very well.
 |
| Figure 2 |
Remembering that for an ideal op amp the inputs
are at the same potential, so Vm
= Vp , its output
voltage is:
Vout = Vp(1+R2/R1) (1)
Where Vp is the voltage on the non-inverting
input of the operational amplifier:
Vp
= Vin –(Vin -VR)*R1/(R2+R1) (2)
In the case of VIN = 0, we
have:
Vp = VR*R1/(R2+R1)
Setting VR = 100 mV, R1 = 300 kΩ and R2 = 100 kΩ, we obtain:
Vout = Vp*4/3
Vp = VR*3/4 = 75
mV
Therefore the output voltage is:
Vout = VR*3/4*4/3 = VR = 100 mV
In the case of VIN = 3000 mV, from
the expression 2 we have:
Vp
= (VIN - VR) *R2/(R2+R1) + VR
And, substituting, we have:
Vp = 3000 –(2900)*3/4= 825 mV
So the output voltage is:
Vout = Vp*4/3 =1100
Setting R1 = 330 kΩ and R2 = 100 kΩ, the conditions imposed are almost perfectly met:
Vin = 0 mV → Vout = 100 mV
Vin = 3000 mV → Vout = 1009 mV
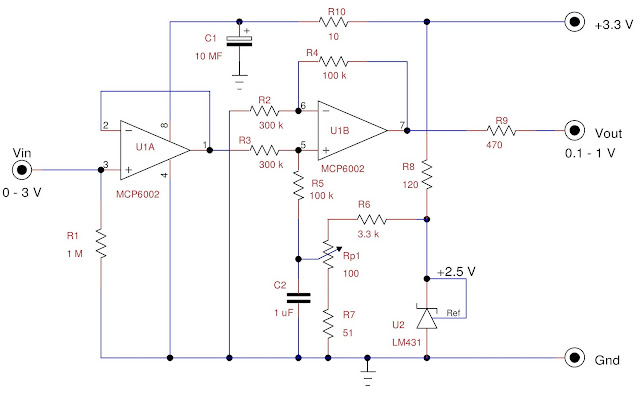
Figure 3 shows the wiring diagram of my
prototype. The operational amplifier U1A serves as a voltage follower, U1B as
an adder, and U2 provides a stable reference voltage. In my prototype I used
the values indicated in the diagram, but I suggest to use the value of 330 kΩ for R2 and R3.
Rail-to-rail operational amplifiers, such as
the one indicated, are particularly suitable for this application.
 |
| Figure 3 |
Now you need to perform a calibration. First
you have to write a program that reads the values of an analog pin, in my case
IO34, and prints them. You can use the Arduino IDE or MicroPython, as in my
case.
Put a jumper between the input and ground for
Vin = 0, then slowly turn the trimmer Rp1 until you begin to see numbers other
than zero.
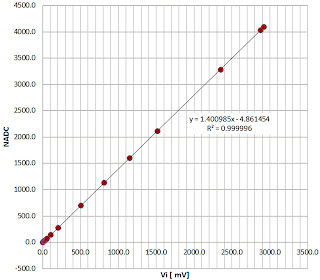 |
| Figure 4 |
We then connect the Vin input to a low-noise,
stable voltage generator, checking the voltage with an accurate digital
voltmeter. I take the various measurements and put them on an Excel-like
spreadsheet to do a linear regression like the one in figure 4. As can be seen,
the results were excellent, with an R2 very close to one. To have
the millivolts output, you need to invert the axes of the regression and insert
the following expression:
mV = NADC*0.713780799+3.473077
Obviously these values are valid in my case.
Components
list
|
component |
description |
component |
description |
|
R1 |
1 MW ± 1% metal film |
R10 |
10 W ± 5% |
|
R2, R3 |
330 kW ± 1% metal film |
Rp1 |
100 Ω multi-turn trimmer |
|
R4, R5 |
100 kW ± 1% metal film |
C1 |
10 µF,35V Aluminum
electrolytic |
|
R6 |
3.3 kW ± 1% metal film |
C2 |
1 µF,25V ceramic AVX |
|
R7 |
51 W ± 1% metal film |
U1 |
MCP6002, dual rail-to-rail op amp |
|
R8 |
120 W ± 5% |
U2 |
TL431, shunt voltage reference |
|
R9 |
470 W ± 5% |
|
|
Program
This program, written in MicroPython, acquires
100 samples at 500 Hz, makes the statistics and prints them. I took the average
value while also observing the standard deviation of the measurements which
must be minimal.
# Program TestADSer.py to test display
and ADC
# Giovanni Carrera, 03/03/2022
from machine import Pin,ADC
from time import sleep,sleep_ms
import math
ch1 = ADC(Pin(34)) #
initializes the analog input
ndata = 100
arr = [0 for i in range(ndata)]
while True:
vmean = 0
vqmean = 0
vmax = 0
vmin = 5000
for x in range(0,ndata):
arr[x] = int(ch1.read())
if arr[x] > vmax :
vmax = arr[x]
if arr[x] < vmin :
vmin = arr[x]
vmean += arr[x]
vqmean += arr[x]**2
sleep_ms(2)
vmean /= ndata # mean value
vqmean /= ndata # mean of quadratic values
k = vqmean - vmean**2
if k >= 0 :
StDev = math.sqrt(k)
else :
StDev = 0
print('Analog ch = IO34')
print('Max =' + str(vmax))
print('Min=' + str(vmin))
print('Mean=' + str('%.1f' %vmean))
print('Sdev=' + str('%.1f' %StDev))
print()
sleep(1)
Reference
1.
“AN682 Using Single Supply
Operational Amplifiers in Embedded Systems”, Bonnie Baker, Microchip Technology
Inc. , 2000
2.
“Analog to Digital Converter
(ADC)”, https://docs.espressif.com/projects/esp-idf/en/latest/esp32/api-reference/peripherals/adc.html#adc-calibration
“ESP32 Technical Reference Manual, Version 3.0”, Espressif Systems